Sunday, January 31, 2010

Wood to Burn

Ok
*
I took a couple snap shots of my wood shed today. I thought these pictures would be a good way to show how much wood I have burnt through this winter. The woodshed you are looking at measures 16' by 8' and I stack the wood about 6 feet tall inside it. This comes out to about 6 cords of wood under the roof. This isn't the only pile of wood I have pulled from this season because in the fall I had about a half cord of pine that I used first before the weather turned cold. In the fall and spring I use my small logs and pine to burn since this stuff burns up too fast in the cold weather. I think I use about 12 cords of wood each burning season, which is a lot of wood when you think about it. An outdoor wood burner uses A LOT of wood...much more than a fireplace or woodstove. Also, keep in mind that I didn't fire up my Hardy H2 until after Halloween this fall due to the warm weather in October and into November. Given everything, I think I'm doing pretty good in my usage so far. I'm happy...I know the gas man isn't!
*
Anyhow...here are a couple views of my wood pile as it looked today. I keep four rows of wood under the roof and a fifth row to the right of this picture. The unmanaged pile in the foreground is fresh cut stuff from this fall. I will be moving these into the wood shed after burning season for next winter.

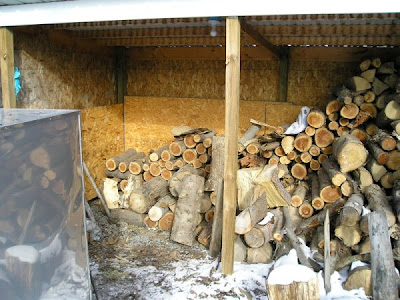
I would estimate that I am half-way through my supply in the wood shed. Keep in mind that I have about three times this amount in strategic piles around my shed that you cannot see in these pictures. Most of the wood I cut this past year came late in the fall and needs to season before I burn it up. I suppose, if I were running short on wood, I could burn the green stuff but that is the luxury of having a wood pile as big as mine now. I probably have about another two years of wood cut up...and that is not counting what I hope to get this next year. Cutting up firewood has become my most favorite hobby...well maybe a close second to baseball, but its something I look forward to doing at any chance I can get.
*
OWB

Wednesday, January 27, 2010

Tales and Tails From the Woodpile

Ok
*
No pictures of this interesting development but last night when filling my Hardy H2 with its evening's compliment of wood, I was startled by something ...At first I thought it was a snake as I saw the tapered end of its tail disappear into the stacks of logs. Upon further review it was an opossum who made a nest in my woodpile! Cute little bugger. The area of my woodpile I am currently picking from is over a year old, so this guy must have taken advantage of the logs as they went undisturbed for a while. He had made a nice pile of leaves and even went as far as to pull a piece of kindling over his structure for added support. It looks like he has been there for a while.
*
Not being a mean spirited woodburner, I placed the log back on top of his nest and gave him the night to remain nestled in his warm bed. This morning he was gone...and as of tonight still no sign of him. I don't know where he ran off to, or how far. For all I know he only moved one cord back into my woodshed and made another nest. Other than birds and an occasional mouse who runs out from under the back of my Hardy, this is the only wildlife I have stumbled across in my woodshed. The mice have been trouble as I have seen where they have chewed on the insulation of my Hardy and even nibbled on some wires. I figure they can only get so far on the wires before Mr Hardy decides to bite back. As for the opossum...he can stay but I may even consider building him a nest myself if he would help tidy around the place, shovel some ash, and stack some wood.
*
Here is a photo of my Hardy and the woodshed after a recent snow fall. I'll be sure to tell my new opossum friend you all said "hello."

Friday, January 22, 2010

Bored...But Got Wood

Ok
*
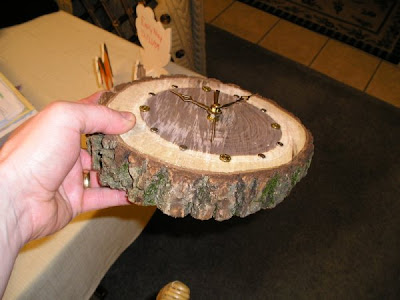
One of the things I enjoy about my Hardy H2 and all my Chainsaws is I have a lot of things to keep me occupied during the doldrums of winter. I have attached some pictures of a project I have completed recently...I made a clock out of a log.
*
Here is the story behind this. In the world of chainsaws a common occurrence is a bunch of people who have...and love...chainsaws will get together and see who's got the best, or smoothest, or fastest saw in the county. When you get all these saws in one place the wood tends to get cut up real quick and the next thing you know...you have a bunch of saws without any wood to cut! Bummer. However, us who love chainsaws have come up with a solution to this problem, which is, we cut "cookies" off of the log...instead of cutting the log into firewood pieces. A cookie is a 1 to 2 inch slice of a log that allows the saw to experience a full cut but in reality you are just cutting off a little bit off the edge. The result of these "cookie cuts" is you have a bunch of cookies laying around at the end of the day.
*
Well...I am not one to let wood go to waste so I collect the cookies and throw them in my Hardy H2 and let them heat my house. As I was gathering the cookies I found a couple walnut cookies that had very nice color and I decided to keep them. I didn't know what for but I thought I could find a use for them. They were too clunky for coasters...but eventually a light went off inside my head and I decided they would make a nice clock. Here is a picture...


I went to a craft store and bought a clock motor for $5. I then gathered some 9mm and .22 spent brass and drilled holes where the numbers would go. Voila...a clock! Not bad if you ask me!
This picture below shows how I routered out the back so the clock motor sets recessed in the cookie...thus allowing the clock to rest flush on the wall.


This picture gives you a good view of how thick the cookie is.


This is what the clock looked like before I started. Walnut is a gorgeous wood. The bark is also nice. So far the clock is still functioning and the wood has not split. I think I may be on to something. Maybe I should become a clocksmith?

Anyhow...I just wanted to share this with you as I get bored at times when the winter weather forces me indoors and my mind starts to wander. I consider this a value added service from me and my saws. I have been itching to buy a new saw by the way...I have a feeling a Dolmar 7900 is in my future.
*
OWB


Sunday, January 10, 2010

Hardy Grates

Ok
*
In earlier posts I have written about maintaining the grates in your Hardy H2 or H4. I have been doing a pretty good job keeping my own grates rotated and free from abuse...but last night I noticed that the center grate was starting to sag...certainly from excessive heat from letting my ash build up too high. The Hardy has a forced draft system and the ash has to be managed so that it doesn't get too high. If you let the ash build up, the coals will rest too close to the grates and the excessive heat will melt them. Or if you keep the ash too low you run the risk of the fire going out. Even though I am aware of the risk of not emptying the ash regularly, I must have been negligent as when I got on my hands and knees and peaked up into the ash bin I noticed one rung of the center grate had broken in half and was sagging. Below is a picture where you can see...about mid way down the grates...one rung sagging and broken. Not a good thing because if I don't do something I will be making a trip to the Hardy store and laying down $50 for a new one.

Again...this is what I see when I get onto my hands and knees and peek up into my ash bin door. This is the underside of the grates with the coals beneath them.


I had to take action so I decided to let the wood burn down over night and, the next morning, I pulled all three grates out. I decided to move the middle grate to the front and I flipped it over so the sagging part was now facing up. This will help straighten it out. While the grates were out I noted I had another grate showing damage so I flipped it over and put it in the back. The best grate I placed in the middle as my experience shows the middle grate takes the most abuse from heat and weight of the logs. Below is a picture of the broken grate when I had them all out. I was surprised to see that I had not one, but two broken rungs. It's probably just a matter of time until this grate fails and I will have to buy a new one. Remember...too much ash means too much heat!


Once I had the grates in I shoveled some coals from the ash bin and dumped them on top of the grates. I threw in some kindling and the fired roared back to life. All of this was done this morning in 8 degree (f) weather in just about 15 minutes! Each time you remove ash you should peek up inside your ash bin and look for sagging grates. Grate Maintenance must be part of your routine with a Hardy OWB. You can see from my experience that its easy to lose track...especially with the horrible weather we have been dealing with in northeast Ohio.

OWB

Web Site Counter
Family Vacations